Design Specifications | Artwork File Instructions:

If you are preparing your own art file for us to print, read this first.
This page is your complete guide to getting it right the first time — from sizes and resolution to file formats and sending your artwork. Following these steps keeps your project on schedule and ensures your finished product looks exactly the way you imagined.

We work with you one-on-one & before we print anything. We always send proofs to you prior to printing, regardless if you send us artwork or if we create it for you.

What "Print-Ready" Really Means

Print-ready means your file is complete and production-ready — built to the exact final size, at 300 dpi, in CMYK, with fonts outlined and bleed added if required.

It should require no additional design work before going into production. Logos, Canva exports, or images with instructions like “put this on a banner” are not print-ready files — those require design service first.

About Your Artwork

Our goal is to make your project look amazing on the very first print run.
The information below will help you prepare your artwork correctly so your project prints beautifully.

Product Sizes & Templates

Each product we offer has its own size and setup requirements. Whenever possible, download the template provided on the product page before you start designing. If no template is listed, contact us first — we’ll send you the correct setup information so you don’t waste time creating the wrong size.

Our templates include:

  • Safety zones – so no text or logos get cut off.

  • Trim marks & bleed requirements – when applicable.

  • Resolution guidance – to make sure your artwork will print clean and sharp.

Starting with the right template saves you time and keeps your design in proportion for a professional result.

File Size

Designing at 100% scale? Set resolution to 300 dpi — that’s your baseline for a clean, professional print.

  • Designing at 50% scale? Set resolution to 600 dpi.

  • Designing at 25% scale? Set resolution to 1200 dpi.

When we preflight your file, if we spot a potential resolution issue, we’ll send you a 100% screenshot so you can see exactly how it will look before we print.

Resolution

Aim for 300 dpi at full size for the best quality.

Do not downsample your file below 300 dpi.
Higher resolution produces a cleaner, sharper print — and we always check before going to production.

Bleed & Visible Area

Bleed is the extra printed area that extends past the final trim size. It ensures you don’t end up with unprinted edges after trimming.

  • Bleed is not always needed for all products — for example, most banners and backdrops do not require bleed.

  • Products like postcards, posters, flyers, and other press-related items usually do require bleed.

  • When in doubt, add at least 0.25″ (1/4″) on all four sides — we’ll evaluate and let you know if it’s necessary.

The visible area is the “safe zone” — the part of your graphic that will actually show once the product is finished.

Keep all important text, logos, and key images inside this area so they don’t get hidden by:

  • Hardware edges

  • Stitching

  • Curves or folds

For products with curved or wrapped sections, avoid placing critical information in those zones.

Color

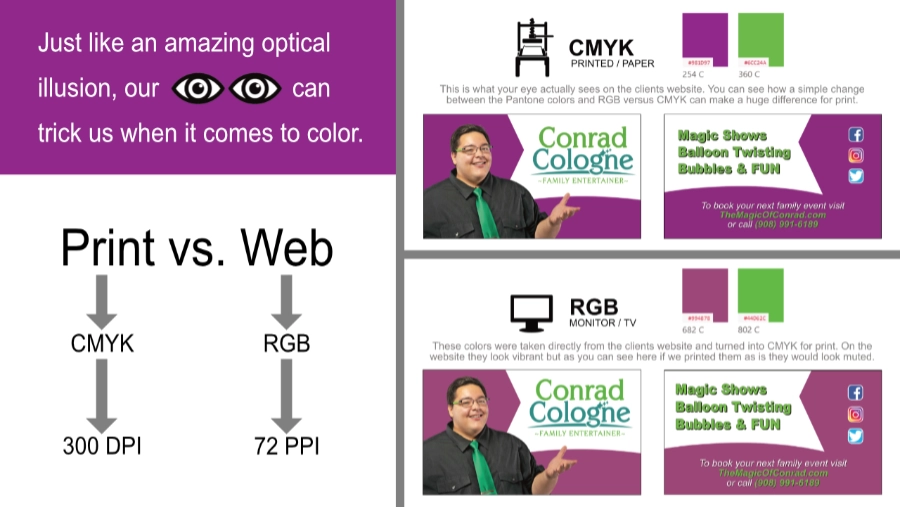
Most printing we do uses CMYK (Cyan, Magenta, Yellow, Black) as the color mode. If we receive files set up as RGB (Red, Green, Blue) then we have to change them to CMYK and this could result in a color shift.

Example: A purple that looks perfect on your screen in RGB can print closer to fuchsia once converted to CMYK. Your eyes can trick you — what looks vibrant on a monitor can look duller or shifted on paper.

We also use the Pantone Matching System as a guide to help print certain colors correctly. If you have any critical colors in your art, please give us the (Solid) Pantone color for it if possible. Depending on the product, we can print very close to these colors, but we do not guarantee a 100% match.

A good rule of thumb, if you have time, is to order a hard-copy proof, which is a print of a small piece of your graphics at 100% size using the printer that will do the final job. This allows you to accurately judge color in the final product.

AI-Generated Logos & Artwork

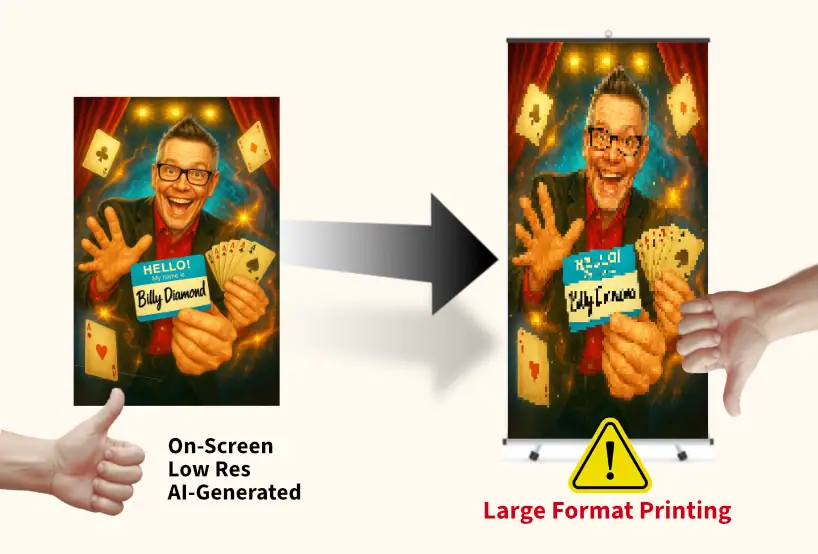
With the rise of AI tools, we’re seeing more artwork files that look fine on screen but fail in print.
Most AI-generated files are:

  • Rasterized (pixel-based) instead of vector

  • Low-resolution (72 ppi or similar) and break when enlarged

  • Missing bleed and/or proper sizing for large-format printing

Because of these issues, AI-generated artwork is not considered print-ready and will not be accepted for production.

Graphic File Types

We accept the following file types:

  • SVG

  • Adobe Photoshop (PSD)

  • Adobe Illustrator (AI, EPS)

These are the most suitable for large-format printing and are our preferred formats. Depending on the product, we may also be able to use:

  • Editable PDFs

  • High-resolution JPGs

  • Flattened TIFF files

Support Files

Always include any support files you used to create your artwork. This includes:

  • Native files used to create EPS or PSD artwork

  • Linked or embedded images

  • Fonts used in your design

Tip: Converting text to outlines is the safest way to make sure your fonts display exactly as you designed them.

Files We Cannot Work With

We do not accept the following file types for final production:

  • Quark

  • CorelDRAW

  • GIF

  • DOC, PPT, INDD, Publisher, or Word documents

These file types may be used only as layout guides — they will need to be redesigned in one of the accepted formats before we can print.

Canva Files Are Not Print-Ready

We can work with Canva files, but they are never considered print-ready artwork.

Here’s why:

  • Canva files are often sent as PNG files, which are not suitable for professional large-format printing.

  • Canva is notorious for incorrect sizing and missing bleed, failing to meet industry-standard specs.

  • To make them usable, we typically need to access your Canva account, download what’s available, and rebuild or resize the artwork to proper specifications.

Because of the extra steps involved, Canva file prep is billed at our hourly design rate and depends on the time required to make the file print-ready.

Important Tips

  • Proofread everything. Billy Diamond’s Branding For Entertainers is not responsible for typos, errors, or resolution problems contained in your art.

  • Check all proofs carefully. If something looks out of place, it’s easier and less expensive to fix before printing and shipping.

  • Do not include trim or color guides inside your file — we need clean, print-ready artwork.

  • Outline all text. In Adobe Illustrator: select text → click TYPE → choose Create Outlines to ensure we see your design exactly as intended.

  • Include linked images with your native file. If your design references external images, send the high-resolution images along with your layout file so we can verify them during preflight.

    Important: Sending images by themselves does not make a file print-ready — they must be placed correctly in your layout at the proper size and resolution.

  • Send Pantone (PMS) colors for any critical colors.

  • Ask about a hard proof if color accuracy is critical.

  • Use flattened TIFF files for full-color designs that do not require Pantone matching. Build the file to full-size product dimensions, use CMYK color mode, and apply LZW compression when flattening to reduce file size.
File Sending

For most products, you can upload your artwork right on the product page or during checkout — this is the fastest way to get your file into our system.

If you’ve already placed an order or have additional files, you can also send us your files through the BFE File Portal.

ADDED FOR YOUR SHOW — MAKE IT YOURS0
No selections yet — choose what serves your show.
Continue Building Your Show
0